The aperture can be changed on your camera to help you capture a great photo in less than ideal lighting conditions. A smaller aperture will result in a darker photo. You can get better detail and less noise by changing the aperture to f/2.8. But remember to experiment before you make a final decision!
f/2.8
Amazing effects can be achieved by a camera with an aperture of f/2.8. For instance, it can make your subject pop off the background and create a lovely blur effect. It also allows more light to enter the camera in dark environments. It can also help give your images a more sharp look.
The camera's f/2.8 aperture will double the amount of light that enters it. This setting is common. The f/stop number can be checked on your camera. It's usually displayed on both the LCD screen and viewfinder of your camera. The f-stops of a camera are usually represented by an "f" and a slash between.
An f/2.8 aperture is a great option for sharpening large areas of your scene, despite the obvious benefits. This can be achieved by moving back or stopping down the lens.
f/22
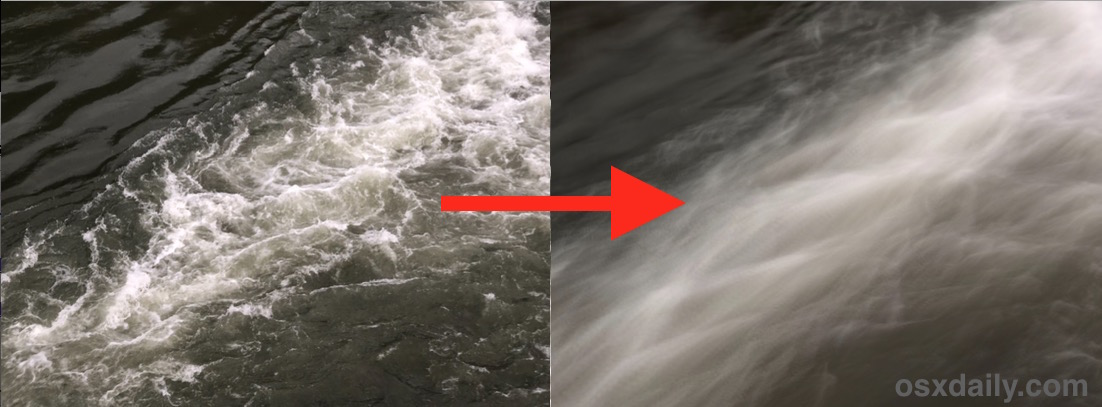
A large aperture is useful when you want to capture a lot of light. This creates a creamy bokeh effect and sharpens the overall focus of the photo. These examples show how different aperture settings can affect photos. For example, the shallow depth of focus at f/1.4 is created by a blurred background, while f/22 creates one.
Sharpness is not only affected by the aperture at F/22. Other settings that can affect sharpness include the focal length of a lens and the focusing location.
Off-stops
You have many options for setting the exposure in your camera. The exposure can be affected by shutter speed (aperture, ISO, and filmspeed), as well as the shutter speed. The exposure amount can be described as the difference between "stops" (or "off-stops") in camera terminology. For the perfect exposure, it is important to understand how to adjust the shutter speed to capture the correct image.
The shutter speed scale is larger than the ten stops shown in the graph. In fact, most photographers use shutter speeds of up to 30'', which is 5 stops slower than 1''. While shutter speeds can reach as high as 8000 stop, some cameras can do even higher.
Diaphragm
The diaphragm is a simple device inside a camera lens that controls the amount of light a picture can capture. The diaphragm is a device in the shape of a circle that has many blades. The aperture is larger the more blades there are. It can be as large or small as 19, or even as many as 5, depending on how many blades are present. The diaphragm aperture in a camera is the largest opening a picture can have.

This opening in a DSLR camera is measured by f-stops. Half a stop decreases the amount light entering the camera. A smaller aperture will result in a larger fstop.
Shutter speed
The shutter speed and aperture work together to control how much light enters the camera. The shutter speed is what controls how long the shutter remains open. The difference between a beautiful and blurry picture is how fast you choose to shutter speed. If you're unsure about which setting is right for your photo, try the manual mode on your camera to figure it out.
When you're trying to capture movement, the shutter speed on your camera is an important factor. A lower shutter speed means a blurry image, while a high shutter speed freezes the subject's motion. The object will freeze faster, so the image will look darker.
FAQ
Where can I buy cameras?
You can find many places online to buy cameras. We recommend purchasing from a trusted retailer such as B&H Photo Video. Their knowledgeable staff can answer any questions that you might have.
B&H ships fast and securely so it is easy to have your order delivered at your doorstep.
If you want to learn more about shopping for cameras, check out this video.
What is the rule to thirds in photography
The rule of Thirds allows you to create unique compositions with minimal camera settings. It divides the image horizontally or vertically into nine equal pieces. This creates three main areas in which you want your subject. These are the top (upper left corner), middle (center) and bottom (lower right). These areas can serve as guides to help you position your subject within your frame.
You can avoid placing important elements too close together, or too far apart, by using the rule of thirds. You might not have enough space between them for a strong visual impact if you put them close together. They might lose focus if they are too close together.
Do I Need A Tripod?
This is one question that everyone wants to know. Although a tripod might not always be needed, they can be useful.
It allows you to hold your camera steady when taking pictures at slow shutter speeds. A tripod is a great option for landscapes and other stationary subjects.
However, a tripod can blurriness if you are photographing moving subjects, such as people or athletes. What are the best ways to determine which situations you need a tripod for?
A tripod is an essential tool for photographing fast-moving subjects or stationary objects. Examples include:
-
Sports
-
People
-
Landscapes
-
Close-ups
-
Macro shots
Try this test to find out if you really need a tripod. Look through the viewfinder with your camera steady. You will need a tripod if you see blurred lines and movement.
If you don’t see blurring, adding a tripod is unlikely to make any difference.
If you do decide on a tripod purchase, these are some things to remember.
-
You should ensure that your tripod has smooth legs. This prevents unwanted vibrations from shaking your camera.
-
Use a sturdy tripod. Some tripods are made of plastic, so they may not be as durable. Consider a tripod made of metal.
-
Consider purchasing a remote release. You can control your camera remotely with this remote release. It can automatically fire the shutter when you press the button.
-
Look for a tripod that has a 360-degree rotating head. It makes it easy to position your camera horizontally or vertically.
-
You should keep in mind that tripods don't come cheap. Expect to pay between $100-200. You will still get a lot out of your money.
-
Accessories such as memory cards and filters are important.
-
Before you buy online, make sure to check your local shops. Many retailers offer free shipping.
-
Read reviews to determine what customers think about a particular product.
-
Ask friends and family members who own similar products.
-
For customer feedback, visit message boards and forums.
-
Search online for user reviews.
-
Amazon.com allows you to compare prices, and receive customer feedback.
-
Browse photo galleries to get an idea of what photographers do with their tripods.
What equipment is required to start digital photography?
First, you need to decide what type of camera is best for you when you first start digital photography. There are many choices, including DSLRs (digital one-lens reflex cameras), point and shoot compact cameras, camcorders, smartphones, and camcorders. Each model has its own unique features and advantages. For example, DSLR cameras offer high-quality images but are typically larger and heavier than other types of cameras. Point-and shoot cameras are lighter and smaller than other types of cameras and can often be set up automatically for certain situations. Camcorders provide excellent video recording capabilities and may also feature still photo shooting modes. Smartphones can be small and lightweight and are easy to transport.
Once you've chosen the type of camera that you want, you can decide whether to purchase a used or new model. Used cameras can be found at reasonable prices, especially if they were purchased within the last few years. Because manufacturers invest large sums of money in developing new technology, new models tend to be more expensive.
Next, you will need to purchase lenses. Lenses play a key role in determining the quality of your photographs. You can adjust the focal length of the lens to allow you to zoom in on the scene without losing focus. Some lenses have built-in flash units, while others require external flash units. Many brands offer many lenses with unique characteristics.
Finally, you need to purchase memory cards. Memory cards are used to store images taken with your camera. Depending on the size of your card, it could hold hundreds or even thousands of pictures. Multiple memory cards are required if you intend to take many pictures.
What camera is best for beginners and what are the pros and cons?
The best camera choice for beginners is determined by your budget, skills, and needs.
For instance, you could choose a point & shoot digital camera if your goal is to save some money. These cameras aren't as versatile as they look, but they provide good quality.
Digital Single Lens Reflex (DSLR) cameras have interchangeable lenses that allow you to shoot various types of shots. These cameras are generally more expensive that point-and clicks, but provide greater flexibility.
For beginners to photography, the beginner's set is a great place for you to start. You'll find everything you need in one package, including a camera body, lens, memory card, tripod, and flash.
You should also remember to buy additional batteries.
What camera should I get?
That all depends on what kind of photographer you want to become. If you're just getting started, a basic point and click camera will suffice.
However, once you've mastered the basics, you'll likely want something more advanced. It really is up to you what you prefer.
These are some things you should consider before buying a camera.
-
Features: What features do you need? Are you going to use autofocus, manual settings, or both? How many megapixels is your camera capable of? Is there a lookfinder?
-
Price: How much money are you willing to spend? Are you looking to replace your camera every few years?
-
Brand: Is it possible to be happy with your brand choice? There is no reason you should settle for less.
-
Functionality: Can your camera function well in low light conditions Are you able to take high-resolution images?
-
Image Quality: How clear, sharp, and crisp are your images.
-
Battery Life: How long can your camera last before it needs to be charged?
-
Accessories: Do you have the ability to attach flashes, additional lenses, and so forth? ?
Statistics
- By March 2014, about 3 million were purchased monthly, about 30 percent of the peak sales total. (en.wikipedia.org)
- Get 40% off Adobe Creative Cloud(opens in new tab) (creativebloq.com)
- There are people out there who will pick at flaws they can only see in 100% crops of your photos. (wikihow.com)
- This article received 13 testimonials, and 100% of readers who voted found it helpful, earning it our reader-approved status. (wikihow.com)
External Links
How To
How to Take Portrait Photos
Portraits are important because it shows who you really are. They are also a way to tell your stories. It's possible to have a favourite picture of yourself, but you are now looking for something different. It is easy to forget the joy of taking photos. Here are some tips to help you get started.
-
You need to have enough lighting. The best time to photograph portraits is in the morning and late afternoon. Avoid direct sunlight shining directly onto your face, if flash is used. This will wash out all details. Avoid shooting at noon. There will be too many shadows.
-
Use a tripod. If you are holding the camera still, there will be no movement. The camera will not freeze the action. You can also set up your flash first, even if you are using it. Then turn off the flash and try again.
-
Close-ups are best. Closeups are great for showing detail. If you have a bad eye, closeups can appear fake. Pay attention to the eyes, noses, and mouths of people. Notice anything unusual? Is it possible that someone is wearing glasses? Are there freckles around her nose? These details add depth to an individual's appearance.
-
Do not force smiles. Smiles are difficult. Smiles can be tricky. Many people smile naturally when feeling happy. Forcing them to smile is a bad idea. You should think about what makes your laugh. Maybe it's something silly like a cat jumping through a hoop. Or maybe you love watching paint dry. It doesn't matter what it is, just keep at it until it makes you laugh.
-
Be creative. People think they're boring. However, being boring is not a bad thing. Try to find ways to break away from the norm. Perhaps you ask the person to place his hands behind your back, or pose with his hands behind your back. You might also suggest that he wears a funny hat.
-
Keep practicing. Practice every day and you will eventually be a better photographer. You will notice more interesting things as you get better.
-
Have fun. Shooting photos should be enjoyable. Enjoying the process will make you more likely to go back. You might even end up with some pretty cool photos.
-
Please share your work. When you are confident in taking good photos, please share them with your family. Tell them why it was taken. Show them where you went. Tell them about your adventures.
-
Be patient. Sometimes, you won't get it right. It happens to everyone. Don't worry. Just move on to another image.