To make your photographs more interesting, there are many composition methods you can use. Learn more about converging, descending, triangle composition methods, and the S Curve. You can also use negative space to create composition elements. It all depends on what you need and what subject matter you want to capture. So, let's get started. Until next time, enjoy photography! Don't be afraid to try new things!
Horizontal lines
If you have ever taken photos, you probably noticed a strong horizontal axis. This connects the subject to either the ground or horizon. One flower will not show these lines well, but multiple objects placed in the same line will give the illusion they are both in perspective. These lines create a feeling of calmness. It is crucial to be able to use horizontal lines when taking photos.
Converging lines
When used correctly, converging lines can be both a leading and supporting actor in your composition. Converging and leading lines are essential because they draw the viewers' attention towards the focal point. Conversely, converging lines can guide them throughout the frame. In addition, placing your subject between two lines can produce dazzling results. You can create a different look for converged lines depending on your perspective.
Triangle composition method
The right type of composition is a triangle's 3 points. Although the connecting lines aren’t visible to the eye, they will be automatically connected by the viewer's eyes to the main subjects. A photograph with triangles makes the subject standout in the mind of the viewer. You can either make multiple triangles to achieve this effect or you can use one triangle to direct the viewer's attention to certain objects in the photo.
S-curve
The S-curve technique is used in most types of photography to separate elements in the frame. This technique can be used to create compositional separation as well as focal points and highlight other elements of the photograph. It works with almost any type of photography. This technique doesn't relate to the rule of threes. You can find more information about how to use S curves in your photos at the Scurve technique photography website.
Light painting
Lighting is an essential part of light painting. It is possible to create a softer look with the white-balance setting on your camera. You should be aware, however, that light painting files only have a limited dynamic range. You must also be aware of the surrounding light. The best time to use light-painting is during the blue hour. This time of day provides the atmospherics of night photography as well as the natural light of the day.
Juxtaposition technique
One photographer might choose to juxtapose two different types or subjects in order to make a picture more interesting. Contrasts can make photos more appealing visually, so a similar combination of colors will create an interesting effect. In addition to shooting with an object in the background, photographers can also take advantage of reflections in puddles, windows, or mirrors. You can capture an interesting juxtaposition by taking many photos and trying different settings.
FAQ
How do I become a good photographer?
Photography is an art form that requires patience, dedication, passion and dedication. Photography is a passion. You will be able to do much more than if your goal was to make a buck.
You must learn how to use your digital camera correctly. Understanding composition, lighting, exposure and depth of field are all important. You also need to have a decent understanding of Photoshop.
Photography is not easy, but once you master it, there is nothing quite as satisfying as creating images that capture moments in time that would otherwise have been lost forever.
If you want to improve your skills, then read books on the subject, attend classes and take part in competitions. This way, you will gain experience and confidence, leading to improvement. What equipment will I need?
It really depends on your type of photography. A wide-angle lens is necessary for landscape photography.
If you're interested in portrait photography, you should get a telephoto zoom lens.
When taking photos, a tripod is essential. It allows you to stand back and compose your picture without moving around.
Camera bags are useful for carrying your memory cards and other accessories.
If you have a compact digital camera, a flash unit will be necessary.
A DSLR (Digital Single Lens Reflex) camera is by far the best choice for beginners who want to take professional quality photos.
DSLRs are great because they let you control every aspect in your photo including shutter speed (aperture, ISO sensitivity), white balance, focus and white balance. A variety of features are available such as autofocus and auto-exposure locks, bracketing, self-timer, and RAW formatting.
Which Lenses should I Use?
Most beginners will ask this question: "Which lens should I buy?" The choice is difficult because of the many options.
The good news? You don’t have to purchase a completely new lens for every new camera you buy. Instead, you can add lenses later on.
There are three types possible lenses.
-
Wide Angle Lens: 14mm - 24mm: These lenses provide a wide angle of vision, which allows you to capture more details of your subject. You can zoom in to improve image quality.
-
Normal/Standard Zoom Lens (28mm - 70mm): These lenses allow you to change focal lengths while maintaining image quality.
-
Telephoto Zoom Lens (70mm, 200mm): These lenses work well for distant subjects. They let you focus on your subject even though they appear small in the frame.
These lenses can be combined to create different effects. To capture close-up details, you can switch between a normal and telephoto lens.
Light Room is a great way to enhance your photos.
To ensure that you get the best photos for your project, it is best to start early. It's better to take as much as possible, then select the best.
Lightroom makes this possible by showing you how different settings affect each photograph. These settings can be adjusted on the fly without having to go back into Photoshop. This allows you to quickly experiment with what looks good and what doesn’t.
Should I get into photography as an interest?
Photography is an excellent way to capture memories and share them with friends and family. It allows you to discover more about the world.
There are many resources online that will help you take better photos if you're interested in this topic.
Consider taking classes at your local community college or art school. This gives you the opportunity to meet other photographers, who can offer valuable feedback.
Statistics
- This article received 13 testimonials, and 100% of readers who voted found it helpful, earning it our reader-approved status. (wikihow.com)
- That's the easiest way to get blurry photos 100% of the time. (photographylife.com)
- Get 40% off Adobe Creative Cloud(opens in new tab) (creativebloq.com)
- There are people out there who will pick at flaws they can only see in 100% crops of your photos. (wikihow.com)
External Links
How To
How to take photographs in low lighting conditions
Low-light photography means taking photos in dimly lit areas. It requires special equipment. The main challenges include controlling exposure, white balance, and sharpness. Low light photography can be divided into two categories: ambient and flash. Flash photography works well when you have enough light. You will need a flash if you don't have enough natural light. A flash might be necessary if you are photographing a subject indoors and outside. Shooting at night in the moonlight hours is a good alternative to using a flash. You will get beautiful shadows and colors. Another option is shooting at twilight. Twilight happens when the sun has set but there is still daylight.
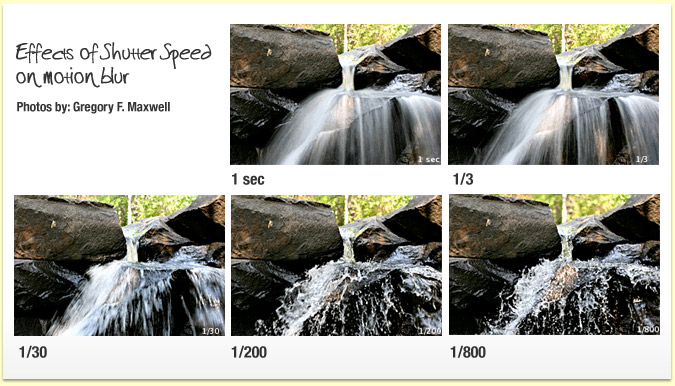
Also, you might want to try long exposures. Long exposures can be used to capture images even if the shutter has been closed for several minutes. When the shutter remains closed, the camera records only light that falls on the sensor. This light falls onto the sensor even after a long exposure. But, the shutter remains closed and no new light enters. Therefore, there is very little movement. To ensure you're getting a clear image, turn off any automatic settings like autofocus and auto exposure. Before you begin shooting, adjust your ISO setting. An ISO setting of 200 allows you to adjust how bright or dark the image looks. When you're ready for the shot, press quickly the shutter button. The shutter will close completely. Then, you should hold the shutter button until the last possible second. To prevent additional light entering the camera, hold the shutter button down. Once you have taken your picture, wait for a few moments before you release that shutter button. This allows your camera to process the picture. While you wait, your photos will be displayed on your computer's screen. Once you're satisfied with them, save them to your computer.